


Here is a number that should get your attention: the global print-on-demand market, valued at $12.39 billion in 2025, is projected to reach $75.3 billion by 2033 (Shopify, 2025). Journals and notebooks sit at the heart of that growth.
What makes journals compelling as a publishing product is their consumable nature. When a reader buys your novel, they read it and move on. When a customer buys your journal, they fill it up and come back for another. That repeat-purchase dynamic is the kind of commercial logic every independent publisher should want in their product catalogue.
Creating and publishing a journal does not require years of writing, a publisher’s contract, or upfront inventory investment. With platforms like Amazon KDP, IngramSpark, Lulu, Barnes & Noble Press, Printify, Printful, Gelato, and Blurb, you can design a journal from scratch, upload it, and have it available for sale globally, all without printing a single copy in advance.
This guide walks you through the full process, platform by platform. Whether you are an entrepreneur building a brand, a coach packaging your methodology, a content creator launching a product line, or a designer monetising your aesthetic, this is your complete publishing playbook.
Table of Contents
Disclosure: Our content is engineered to help you make informed, data-driven, and smart decisions. Digital Solutions Edge is reader-supported; when you engage with our recommendations or click certain links, we may receive a commission. This support allows us to continue delivering the digital solutions you rely on. Thank you for being part of our community.
What Kind of Journal Should You Create?
Before you open Canva or download a template, you need a clear answer to the most important question in publishing: who is this for? Every design decision, every pricing choice, every platform you choose flows from that answer.
Journal Types and What They’re Best For
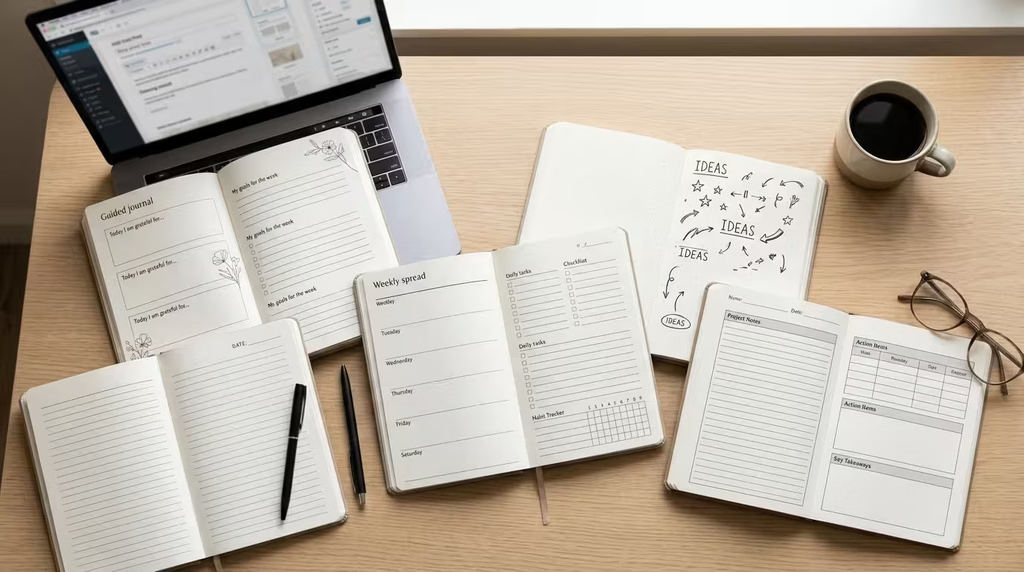
Lined or Ruled Journals are the classic option. They work for general audiences, professionals, students, and daily writers. The interior is simple to design but requires a strong niche angle to stand out in crowded marketplaces.
Dot Grid Journals are the bullet journaling community’s staple. They attract a design-forward, productivity-minded audience willing to pay a premium for good-quality paper and a thoughtful cover.
Blank Page Journals serve artists, sketchers, and freeform thinkers. They are among the simplest interiors to produce yet command strong loyalty from creative audiences.
Prompted Journals include specific writing questions, affirmations, or reflections on each page. These are higher-value products because the interior content itself is your intellectual property. A gratitude journal with daily prompts sells at a higher price point than a plain lined notebook.
Planner-Journals combine daily scheduling, goal tracking, and reflective writing. They attract coaches, productivity enthusiasts, and business owners. These are also among the most reusable product formats because customers need a new one at the start of every year or quarter.
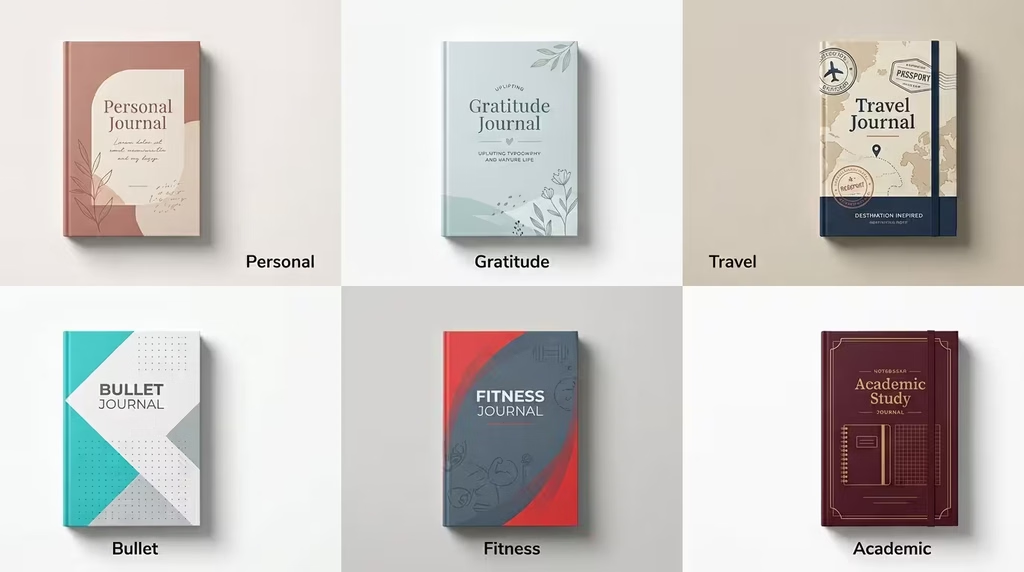
Speciality Journals cover niche audiences with precision: pregnancy journals, sobriety trackers, reading logs, prayer journals, fitness trackers, travel logs, and dream diaries. The narrower and more specific your niche, the less price competition you face.
Choosing Your Niche Smartly
Generic sells slowly. Specific sells consistently. A journal titled “Daily Writing Journal” competes with thousands of listings. A journal titled “The Night Shift Nurse’s Daily Reflection Journal” speaks directly to one profession, one schedule, and one identity.
Use tools like Google Trends, Amazon’s category bestseller lists, and Etsy search suggestions to identify niche demand before you invest time in design. Look at what is already selling and ask where the gaps are, then build there.
3. Design Tools You Need Before You Upload Anything
Every platform covered in this guide requires two files: an interior PDF and a cover PDF. Understanding how to produce print-ready versions of both is foundational.
For Interior Design
Canva (Free and Pro): Canva is the most accessible design tool for journal creators. Set up a custom document at the exact dimensions of your chosen journal size (for example, 5.75 x 8.25 inches for a standard journal). Create your page templates, duplicate them across 100 to 200 pages, and export as a flattened PDF. Canva’s free tier is sufficient for most interior designs.
Adobe InDesign: The industry standard for print layout. InDesign gives you precise control over margins, bleed, and embedded fonts. It has a steep learning curve, but Lulu and IngramSpark both provide free InDesign templates to reduce the setup burden.
Microsoft Word or Google Docs: Suitable for text-heavy interiors like prompted journals or workbook-style content. Export as PDF before uploading and ensure all fonts are embedded.
Affinity Publisher: A powerful, lower-cost alternative to InDesign. Capable of producing professional print-ready PDFs without the Adobe subscription.
For Cover Design
Cover design depends on the platform’s specifications, which vary based on your page count. Every platform provides a cover template generator or calculator. Use it every time. Designing a cover without downloading the correct template is the most common cause of file rejections.
The cover calculator takes your trim size, page count, and paper type as inputs and generates a template with the correct spine width, bleed, and safe zones built in. Design within those safe zones. Place your title, author name, and any imagery away from the edges.
For standard quality, your cover image resolution must be a minimum of 300 DPI. Lower resolution files will be flagged during the review process or will print poorly.
Recommended tools for cover design: Canva Pro (easiest), Adobe Photoshop, Affinity Photo, or Kittl for complex illustrative covers.
Book Bolt — The All-in-One KDP Design and Research Tool
If Amazon KDP is your primary publishing platform and you are creating low-content or no-content journals at scale, Book Bolt deserves a prominent place in your toolkit. It is not a publishing or printing platform — it does not host, print, or distribute your journal. Think of it as the cockpit for your entire KDP journal operation.
Book Bolt combines three functions that would otherwise require separate tools: niche and keyword research, interior and cover design, and listing optimisation. Its Book Scout research module pulls real-time Amazon search data, showing you true demand volume and competition levels for any journal niche before you design a single page. Rather than guessing whether “prayer journal for men” has buyers, you get actual data showing monthly search volume and how saturated the market is (Book Bolt, 2025).
The interior wizard offers more than 130 pre-built templates for journals, planners, dot-grid notebooks, logbooks, and activity books, all pre-sized to KDP’s exact dimensions. You drag, drop, and customise, then export a KDP-ready PDF with one click. No margin maths, no size errors, no rejected uploads because of dimension mismatches.
Book Bolt’s pricing starts at approximately $9.99 per month for the Newbie Plan (journals and planners) and $19.99 per month for the Pro Plan, which adds puzzle creation tools. A three-day free trial is available. It is a KDP-exclusive workflow tool; if you plan to publish journals on IngramSpark, Lulu, or other platforms, you will still need separate tools for those. But for KDP-focused journal creators who want to move from idea to published product as efficiently as possible, Book Bolt is a genuine productivity multiplier (Scribe 2026).
Publisher Rocket is another research tool worth knowing. It focuses specifically on Amazon keyword and category research for both KDP books and ads, covering all book types (not just low-content). If your journal strategy involves Amazon Advertising, Publisher Rocket is the more comprehensive research companion alongside or instead of Book Bolt.
[VIDEO PLACEHOLDER: Walkthrough of creating a 6×9 journal interior in Canva and exporting it as a print-ready PDF]
Key Specs to Know Across All Platforms
Before diving into each platform, these are the non-negotiable technical standards that apply broadly across all of them.
File format: All platforms require a PDF for print interiors. Some accept Word documents, but PDF is always the safer choice because it preserves fonts, layout, and image quality.
Resolution: 300 DPI minimum for all images, including the cover. This ensures the printed result matches your design.
Bleed and margins: Bleed is the extra space beyond the trim line that prevents white borders after cutting. Standard bleed is 0.125 inches on all sides. Margins keep your content away from the edge and the gutter (the inner edge where pages are bound). For a 6 x 9 journal, KDP recommends a minimum margin of 0.25 inches.
Colour mode: All print files must be in CMYK colour mode, not RGB. RGB is for screens; CMYK is for print. Designing in RGB and exporting to print will produce colour shifts, often with blues turning purple and greens turning muddy. Set your document to CMYK before you begin.
Fonts: Embed all fonts in your PDF before uploading. Non-embedded fonts are a common reason for file rejection or layout breaks.
ISBN: An International Standard Book Number is a unique identifier for your published book. Amazon KDP provides a free ISBN for its own marketplace, but this ISBN is tied to Amazon and cannot be used on other platforms. If you plan to publish across multiple platforms, purchase your own ISBN from Bowker (US), Nielsen (UK), or your country’s national ISBN agency.
Platform 1: Amazon KDP: The High-Volume Marketplace
Amazon Kindle Direct Publishing is the most widely used self-publishing platform in the world. For journal creators, it offers the largest built-in audience, zero upfront costs, and a straightforward upload process. The trade-off is that the marketplace is competitive and the royalty structure rewards volume over premium pricing.
Why Amazon KDP Works for Journals
Amazon KDP uses a print-on-demand model. When a customer orders your journal, Amazon prints it, packs it, and ships it. You receive a royalty after printing costs are deducted. You carry no inventory and take no financial risk on unsold stock.
For journals specifically, KDP is the entry point most creators use first. The barrier is low, the reach is vast, and the setup can be completed in a single session.
Step-by-Step: Publishing a Journal on Amazon KDP
Step 1: Create Your KDP Account
Go to kdp.amazon.com and sign in with your existing Amazon account or create a new one. You will need to provide your name, address, and banking information for royalty payments. You will also complete a tax interview — do not skip this step, as it affects how your royalties are processed.
Step 2: Research Your Niche and Keywords
Before designing anything, spend time on Amazon itself. Search for journals in your intended niche and study the top-selling listings. Note their titles, subtitles, descriptions, and the keywords you think helped them rank. Tools like Publisher Rocket and Book Bolt offer keyword research specifically for KDP and are worth the investment if you plan to publish at scale.
Choose a primary keyword that reflects exactly what your journal is (for example, “gratitude journal for women” or “daily planner journal for teachers”) and work it into your title, subtitle, and description.
Step 3: Design Your Interior
Choose your trim size first. Popular options for journals include:
- 6 x 9 inches: The most common and widely recognised journal size. Works for lined, dot grid, and prompt journals.
- 5 x 8 inches: Slightly more compact and pocket-friendly.
- 7 x 10 inches: Ideal for workbook-style or planner journals with larger layouts.
- 8.5 x 11 inches: Best for art journals, sketchbooks, or content-heavy planners.
Design your interior pages in Canva, InDesign, or your preferred tool. A standard journal is between 100 and 200 pages. KDP requires every page to appear in your PDF, so if your journal is 120 pages, your interior PDF must have 120 pages, not 60 two-sided sheets.
Set margins at 0.25 inches minimum on all sides. For books with a page count of 150 or more, increase the inner margin (gutter) to at least 0.375 inches to account for the binding.
Step 4: Design Your Cover
After finalising your interior (because the spine width depends on page count), go to the KDP Cover Calculator at kdp.amazon.com/en_US/cover-templates. Enter your trim size, page count, and paper type to generate a template.
Download the template and use it as the base for your cover design. Design your front cover, spine, and back cover as a single flat file. Include a barcode placeholder on the back cover — KDP will insert its barcode automatically.
Export your cover as a print-ready PDF at 300 DPI with 0.125-inch bleed on all sides.
Step 5: Log In to Your KDP Dashboard and Create a New Title
Click “Create” on your KDP Bookshelf and select “Paperback.” Enter your book details:
- Title and subtitle: Use your primary keyword at the beginning of the title.
- Author’s name or pen name
- Description: This is your sales pitch. Write 150 to 400 words that speak directly to your target reader. Include your primary keyword naturally and describe who the journal is for and how it will benefit them.
- Keywords: KDP allows seven keyword fields. Use each one strategically. You can enter keyword phrases, not just single words.
- Categories: Select two categories. Choose the most specific subcategories available.
- Publication date
Step 6: Upload Your Interior and Cover PDFs
In the “Manuscript” section, upload your interior PDF. In the “Book Cover” section, upload your cover PDF. KDP’s online previewer will then generate a visual proof of your journal. Review it carefully for margin issues, image cropping, and any text that falls into the bleed zone.
If the previewer flags any errors in red, fix them before proceeding. Yellow warnings are non-blocking but worth addressing.
Step 7: Set Your Pricing and Royalty Rate
KDP offers two royalty structures for paperbacks: 60% royalty for books priced $2.99 and above (as of June 2025, this rate applies to books under $9.99; books priced $9.99 and above earn 60% royalty). The platform calculates your minimum price based on printing costs, which vary by page count, paper type, and distribution territory.
Check the royalty calculator within the pricing section to see your estimated earnings per sale at different price points. Research comparable journals in your niche and price competitively.
Select “Expanded Distribution” to make your journal available to other retailers and libraries through Amazon’s distribution network.
Step 8: Submit for Review and Publish
Once you are satisfied with the previewer results, click “Submit for Review.” KDP typically reviews and approves submissions within 24 to 72 hours. You will receive an email notification when your journal goes live.
KDP-Specific Tips
- You can publish the same interior with different covers as separate listings, but KDP’s content policies prohibit uploading near-identical content to game the system. Each listing must offer meaningful differentiation.
- Use white paper for journals with heavy graphical elements; cream paper works better for text-heavy, prompted journals, as it reduces eye strain.
- Enrolment in KDP Select is optional for print books. For paperbacks and hardcovers, you are not required to grant Amazon exclusivity.
Platform 2: IngramSpark: Wide Distribution for Serious Publishers
IngramSpark is the platform you graduate to when you want your journal to reach beyond Amazon. Through its parent company, Ingram Book Group, IngramSpark distributes titles to over 40,000 retailers, libraries, and online stores globally, including Barnes & Noble, Walmart, Target, independent bookshops, and school systems (Reedsy, 2025).
If Amazon is the largest single marketplace, IngramSpark is the infrastructure that connects you to all the others simultaneously.
Who IngramSpark Is For
IngramSpark suits journal creators who are publishing with intent, those building a recognisable brand, running a coaching business with branded products, or targeting academic and institutional buyers. It is also the platform most independent bookshops use to source titles for physical shelves.
The setup process is more involved than KDP and requires more technical precision upfront. IngramSpark’s interface is less forgiving of formatting errors, so your files must be clean and print-ready before you upload. As one review put it, IngramSpark does not hold your hand through formatting, so immaculate preparation is non-negotiable (Reedsy, 2025).
Important Caveat: IngramSpark’s Policy on Blank-Content Books
Before proceeding, note a critical restriction: IngramSpark’s content guidelines explicitly exclude books with a “material amount of blank pages like notepads, scratchpads, journals, or similar type content” (IngramSpark User Guide, August 2025). This means a purely blank or lined journal with no substantial authored content will be rejected.
Journals on IngramSpark need to carry authored content, such as writing prompts, reflective questions, guided frameworks, affirmations, instructional introductions, or any meaningful editorial content that distinguishes the book from a commodity blank notebook. If your journal is prompted, guided, or educational in nature, IngramSpark is a strong option.
Step-by-Step: Publishing a Journal on IngramSpark
Step 1: Create Your Account
Register at ingramspark.com. You will verify your publisher status and provide business or personal information. IngramSpark may ask you to confirm that you are publishing original content, not reprints or derivative summaries.
Step 2: Obtain Your ISBN
Unlike KDP, IngramSpark requires you to supply your own ISBN for distribution. Purchase from Bowker in the US (myidentifiers.com) or from Nielsen in the UK (isbn.nielsenbook.co.uk). A single ISBN costs approximately $125 USD from Bowker; a block of 10 costs $295 USD, which brings the per-unit cost down significantly if you plan to publish multiple titles.
Each format (paperback, hardcover, ebook) requires its own separate ISBN.
Step 3: Prepare Your Interior File
IngramSpark accepts print-ready PDFs with all fonts embedded, images at 300 DPI, and CMYK colour mode. Download IngramSpark’s file creation guide from your account dashboard. They also provide free templates for Adobe InDesign, Microsoft Word, and other tools.
For a guided journal, the interior content matters as much as the design. Write your prompts, structure your sections, and proofread the text thoroughly before building the final PDF. Revisions on IngramSpark have traditionally come with a fee, though as of February 2026, IngramSpark announced unlimited file revisions for all clients (IBPA, 2026).
Step 4: Generate and Design Your Cover
Use IngramSpark’s Cover Template Generator in your account portal at myaccount.lightningsource.com/Portal/Tools/CoverTemplateGenerator. Enter your trim size and page count to download the correct template.
Design your cover at 300 DPI with the required bleed. IngramSpark’s print quality is regarded as reliable and professional, but your design must meet their technical standards precisely.
Step 5: Upload and Set Metadata
In your IngramSpark dashboard, create a new title and select your format. Upload your interior PDF and cover PDF separately. Enter your metadata:
- Full title and subtitle
- Author name
- Publisher imprint name
- BISAC category codes (use the full hierarchy, for example: “SELF-HELP / Journaling” gives better placement than just “SELF-HELP”)
- Book description
- Keywords
- Pricing in each currency you want to enable
Step 6: Set Your Pricing and Distribution Channels
IngramSpark operates on a wholesale model. Retailers who carry your book purchase it at a wholesale discount, typically 40% to 55% off your retail price. You receive the wholesale price minus the printing cost. Set your retail price high enough to ensure a positive margin after the wholesale discount and printing cost.
Use IngramSpark’s Price Calculator at myaccount.ingramspark.com/Portal/Tools/ShippingCalculator to model your numbers before committing.
Enable both the US and global distribution channels if your content is appropriate for an international audience.
Step 7: Order a Proof Copy
Before approving your title for distribution, order a physical proof copy. Ingram prints and ships it to you. Review it carefully for colour accuracy, margin alignment, paper quality, and binding. Approve the digital proof in your dashboard once you are satisfied.
Step 8: Approve for Distribution
Once you approve the proof, your journal enters Ingram’s distribution catalogue. It will appear in retailer ordering systems within two to three weeks. Getting onto Amazon via IngramSpark requires disabling KDP’s Expanded Distribution first to avoid channel conflict.
IngramSpark vs. KDP: The Dual-Platform Strategy
Many independent publishers use both KDP and IngramSpark together. They publish on KDP for Amazon sales (disabling Expanded Distribution on KDP) and publish on IngramSpark for everywhere else. This approach maximises reach without the two platforms competing directly over the same orders.
If you take this route, use your own ISBN on IngramSpark and let KDP assign its own ASIN for the Amazon listing. Maintain consistent metadata across both platforms.
Platform 3: Lulu: Creative Freedom with Spiral Binding and Direct Sales
Lulu occupies a distinct position in the journal publishing landscape. Where KDP excels at marketplace volume and IngramSpark at global retail distribution, Lulu’s competitive advantage lies in product flexibility and direct-to-consumer tools.
Lulu offers spiral (coil) binding, which no major print-on-demand platform matches in terms of accessibility. Spiral binding is the format many buyers prefer for working journals, planners, and daily trackers because the book opens flat without resistance. If your journal is a planner or daily practice tool, Lulu’s coil binding is a genuine differentiator.
Lulu also integrates with Shopify, Wix, and WooCommerce through its Lulu Direct feature, enabling you to sell journals through your own website with white-label fulfilment, meaning your customer receives the product without any Lulu branding.
Step-by-Step: Publishing a Journal on Lulu
Step 1: Create Your Lulu Account
Go to lulu.com and sign up for a free account. Lulu supports PayPal payouts with no minimum threshold, which is a practical advantage for publishers outside the United States.
Step 2: Download Templates and Design Your Interior
Navigate to Lulu’s Publishing Toolkit at lulu.com/publishing-toolkit. Select your journal size and binding type. Lulu offers pre-formatted interior templates for InDesign, Photoshop, and Word, as well as pre-built interior PDFs for notebooks and planners in 100-page and 200-page versions.
If your journal uses one of these standard interior styles (lined, dot grid, or blank), you can download a ready-made interior PDF and focus all your creative energy on the cover. For prompted or guided journals, use the templates as a structural base and add your content on top.
Key Lulu binding options for journals:
- Perfect bound (softcover): Standard paperback binding. Suitable for most journals.
- Coil-bound (spiral): Opens flat, ideal for planners and working journals. Unique to Lulu among the platforms covered here.
- Saddle-stitched: Staple binding. Best for shorter journals under 92 pages.
- Hardcover: Available in casewrap or with dust jacket.
Step 3: Use Lulu’s Pricing Calculator for Cover Dimensions
After finalising your page count and binding type, use Lulu’s Pricing Calculator to download your cover template. Lulu measures cover files in PostScript points (they include pixel equivalents in brackets). Design your cover to the exact dimensions generated by the calculator.
Upload your cover as a flattened PDF. Fonts should be embedded, and all images should be at 300 DPI. Lulu recommends fonts like Garamond for copyright and back-cover text for consistent rendering.
Step 4: Create Your Book Project
Log in to your account and click “Create”, then “Print Books”, then “Start Your Print Book.” Select your product type (Print Book), then set your publishing goal:
- Lulu Bookstore: Sells directly through Lulu’s own storefront. You earn 80% of the revenue.
- Global Distribution: Lists your title with major online retailers. Requires an ISBN. Profits are reported to tax authorities, and you must submit a W-9 or W-8 BEN form.
- Lulu Direct: Connects to your own website or e-commerce store. Best for brand-building.
If you opt for Global Distribution, Lulu will provide a free ISBN if you do not have your own. Lulu strongly recommends purchasing your own ISBN for maximum portability and control.
Step 5: Upload Your Interior File
Upload your interior PDF. Lulu will run an automated check and flag any issues in pink (warnings) or red (errors). Red flags must be resolved before proceeding. Make your files print-ready within the platform before moving forward.
A useful feature: if you publish multiple journals with the same interior layout, Lulu stores uploaded files in your account. For subsequent titles, you only need to upload a new cover, saving significant time.
Step 6: Add Metadata and Set Your Price
Enter your project title, language, categories, and keywords. Add at least three categories for better discoverability. In the Pricing and Payees section, set your retail price, review the revenue breakdown per sale, and designate who receives payment.
Step 7: Finish and Publish
Review all sections, then click “Confirm and Publish.” Your journal becomes available based on your chosen distribution settings. For the Lulu Bookstore, it is listed immediately. For Global Distribution, allow additional processing time as the book enters retail catalogues.
Step 8: Order a Proof Copy
Lulu regularly distributes discount codes via its newsletter, which are particularly useful for ordering proof copies at low cost. Subscribe to their newsletter from the account settings page. Always order a physical proof before marketing your journal widely.
Lulu’s Unique Selling Points
- Spiral binding at accessible prices
- White-label fulfilment for your own website (Lulu Direct)
- Calendar and photo book creation alongside journals
- PayPal payouts without a minimum threshold are practical for creators outside the US
Platform 4: Barnes & Noble Press: Reaching the B&N Readership
Barnes & Noble Press (B&N Press) launched in 2018 as the bookstore chain’s self-publishing response to Amazon KDP. It supports paperback, hardcover, and NOOK ebook formats, with print-on-demand fulfilment for physical titles.
Publishing directly on B&N Press places your journal in front of a distinct readership. Barnes & Noble customers are, on average, avid readers who are actively looking for physical books and stationery products. The platform also offers marketing tools, genre newsletters reaching over 500,000 readers, and promotional placement opportunities for B&N Press authors.
Important Limitations to Know
B&N Press is only available to authors in 12 countries: the United States, the United Kingdom, Canada, Australia, New Zealand, Belgium, France, Ireland, Italy, Germany, Spain, and the Netherlands. If you are based elsewhere (including Nigeria), you can still publish to B&N through aggregators like Draft2Digital. B&N Press does not get your journal into physical libraries, only onto BN.com (Daniel J Tortora, 2026).
Step-by-Step: Publishing a Journal on Barnes & Noble Press
Step 1: Create Your Account
Go to press.barnesandnoble.com and sign in with your Barnes & Noble account or create a new one. The signup process is straightforward and mirrors similar platforms in structure.
Step 2: Create a New Project
In your dashboard, navigate to “Projects” and select “Create a New Book.” Choose between an ebook and a print book. For a physical journal, select Print.
B&N Press’s setup process is described as more guided than KDP’s, with prompts and contextual help appearing at each stage, a useful feature for first-time publishers (E.A. Baker, 2024).
Step 3: Enter Your Title and Book Details
The platform prompts you to enter your title first, then moves through:
- Author name and contributor details
- Series information (if applicable)
- Edition number and description
- Language
- Categories and keywords
Step 4: Format and Upload Your Interior
B&N Press accepts PDFs for print books. Upload your interior file formatted to your chosen trim size. The platform will display formatting guidance based on the size you select. It will also ask you to prepare interior images, embed fonts, and confirm print readiness.
For journals with photography, illustrations, or full-colour content, select “Full Premium Colour” with white paper (70 lb) to prevent show-through between pages.
Step 5: Upload Your Cover
Upload your cover file separately. For ebook formats, B&N requires cover images with a height and width of at least 1,400 pixels and a file size between 5KB and 2MB. For print covers, follow the same bleed and resolution standards as other platforms.
Step 6: Complete Metadata
Return to the metadata sections to review all fields. B&N Press gives you direct control over its category taxonomy, which means you can see and choose exactly where your journal will be shelved in their catalogue, a level of category control that Amazon does not offer as transparently.
Add your subtitle, keywords, and book description. The description is your primary sales tool on BN.com.
Step 7: Set Pricing and Returnability
Set your retail price. Choose whether to enable returnability (allowing retailers to return unsold copies). Enabling returnability increases your chances of physical bookstore placement. B&N Press does not publish detailed royalty rate tables as explicitly as KDP, but the platform is comparable in overall royalty structure to other POD services.
Step 8: Submit and Wait for Review
Submit your files for review. B&N Press typically processes and publishes books within 72 hours, mirroring KDP’s timeline (Self-Publishing School, 2025). You will receive a notification once your journal is live on BN.com.
Getting Into Physical Barnes & Noble Stores
Publishing on B&N Press puts your journal on the website, not necessarily on physical shelves. For brick-and-mortar placement, the most reliable route is publishing through IngramSpark, whose distribution infrastructure Barnes & Noble already uses for supplier relationships. You can also contact B&N’s Small Press Department directly to be considered for shelf placement; the review process typically takes four to six weeks.
Platform 5: Printify: Print-on-Demand for Etsy, Shopify, and Beyond
Printify operates on a different model from the platforms above. It is not a self-publishing platform for books; it is a print-on-demand product fulfilment network that connects to e-commerce stores. Printify produces notebooks and journals as physical merchandise, connects to Etsy or Shopify, and handles printing and shipping per order.
The distinction matters. On Amazon KDP, your journal is listed as a book in a book marketplace. On Printify connected to Etsy, your journal is listed as a product in a handmade and creative goods marketplace. These are different audiences with different buying psychology, and often different price tolerance.
Printify suits creators who want to sell custom-branded journals as merchandise, launch a stationery line, or integrate journals with an existing Etsy or Shopify store. It is especially strong for aesthetic, niche-design products targeting communities like bullet journalers, spiritual practitioners, or wellness enthusiasts.
What Printify Offers for Journal Creators
Printify’s catalogue includes:
- Spiral softcover notebooks
- Hardcover journals
- Softcover journals (with optional inside print panels, as discussed in the documents you provided)
- Dot grid, lined, and blank page options
- Multiple sizes
Production time is two to seven business days per order, with global fulfilment centres across the US, Europe, Asia, and beyond. Printify’s base cost for notebooks typically ranges from $5.50 to $8.0,0, depending on style and supplier, leaving room for healthy margins at retail prices of $15 to $25 (EComposer, 2025).
Step-by-Step: Publishing and Selling a Journal Through Printify
Step 1: Create a Free Printify Account
Go to printify.com and sign up for a free account. Printify’s free tier allows unlimited product creation and store connections. The Printify Premium plan at $29 per month unlocks up to 20% off all products, which materially improves your margins at scale.
Step 2: Browse the Catalogue and Select Your Journal
From your Printify dashboard, navigate to the Catalogue and select “Journals and Notebooks.” Browse the available products and pay attention to:
- The print provider (Printify works with multiple providers, and quality can vary between them)
- The available page styles (lined, dotted, blank)
- The trim size options
- The base price
Order samples from two or three providers before committing. The sample order step is critical: what looks good on a mockup may differ in colour accuracy, paper thickness, or binding quality in reality.
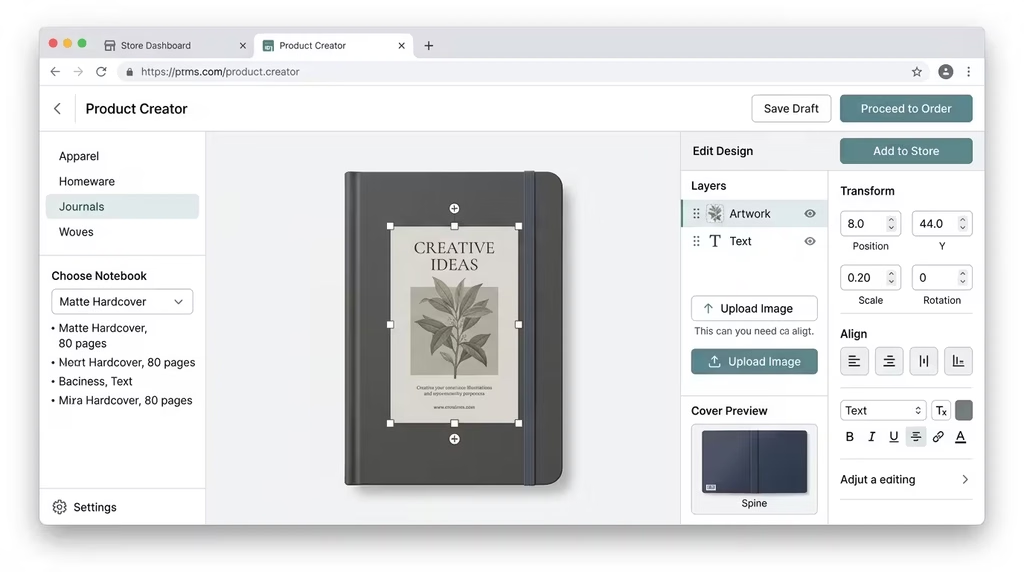
Step 3: Design Your Journal Cover Using the Product Creator
Printify’s Product Creator is built into the dashboard. Upload your cover design file or create one within the tool using:
- The AI Image Generator (for design inspiration or background elements)
- The Custom Text Editor
- Background Removal
- The Pattern Creator for all-over-print designs
For the softcover journal with inside prints, Printify offers six customisable inner pages (three physical sheets, front and back). Page 1 front/back covers the inside front cover and the first interior sheet. Page 2 front/back is the second interior sheet. Page 3 front/back is the third sheet before the main ruled pages begin. These pages are ideal for a brand introduction, writing prompts, or a personal dedication from you to the reader.
Step 4: Connect to Your Sales Channel
Printify integrates natively with Etsy, Shopify, WooCommerce, eBay, TikTok Shop, and several other platforms. Select your preferred channel and follow the authentication prompts to connect your store. Once connected, you can publish products directly from Printify to your store with one click.
If you do not have an Etsy shop, create one at etsy.com/sell first, then return to Printify to connect it.
Step 5: Write Your Product Listing
The listing is where discoverability and conversion happen. Write a title that includes your primary search keyword at the beginning. Write a description that speaks to your buyer’s specific situation, not just the journal’s features. Etsy’s search algorithm relies on titles, tags, and description keywords, so research what buyers are searching for before writing.
Add all available tags (Etsy allows 13 per listing) using a mix of specific terms (“gratitude journal for women”) and broader terms (“mindfulness journal”).
Step 6: Set Your Price
Work backwards from your desired margin. Take Printify’s base cost plus shipping estimate, then add your profit. A minimum margin of 40% is recommended for notebook businesses (Printify, 2025). For example, if a journal costs $7.50 to produce and $5.00 to ship domestically, a retail price of $21 to $25 gives you a healthy margin.
Step 7: Publish and Manage Orders
Once your listing goes live, Printify handles fulfilment automatically. When a customer orders from your Etsy or Shopify store, the order is sent to Printify, which routes it to the appropriate print provider, produces the journal, and ships it directly to the customer. You never touch the product.
Monitor orders through your Printify dashboard and your store’s order management system.
Platform 6: Printful: Premium Quality POD with Global Reach
Printful and Printify are the two platforms most frequently compared in the POD world. Where Printify operates as a network of third-party print providers, giving you pricing choice, Printful owns and operates its own fulfilment facilities. That distinction matters for quality consistency: every order on Printful goes through the same controlled production environment and a rigorous three-step quality check before it ships (Printful, 2025).
This makes Printful the preferred choice for creators who prioritise print consistency over the lowest possible base cost. The slightly higher prices are a deliberate trade for reliability, particularly important when you are building a brand where quality perception drives repeat purchases and word-of-mouth referrals.
What Printful Offers for Journal Creators
Printful’s notebook and journal catalogue includes three core products, each suited to a different market position:
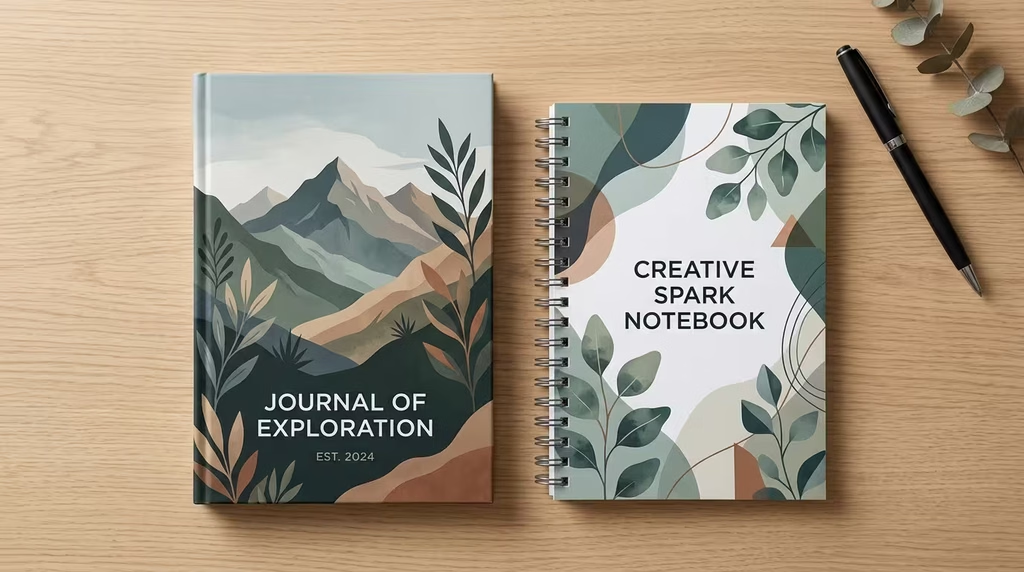
Spiral Notebook (softcover): Soft-touch cardboard cover with a wire-o metal binding that lies flat for easy writing. 100 dotted pages. Ideal for bullet journaling, sketching, and daily use. The wire-o binding differentiates it from most POD journals, which use perfect binding.
Hardcover Bound Notebook (JournalBook): 80 cream-coloured lined pages with an elastic band, ribbon marker, and expandable inner pocket. This product has a professional, premium feel that suits corporate gifting, branded merchandise, and high-end personal journals. The elastic band and ribbon marker are features customers associate with quality stationery brands.
Matte Hardcover Journal: A fully printable wraparound cover with 150 lined pages. Its sleek, versatile format is ideal for limited edition collections, seasonal designs, and creator-branded product lines.
Printful also offers an optional branded add-on: kiss-cut stickers included with your customer’s package for an extra fee, a practical way to deepen your brand impression without a separate fulfilment operation.
Step-by-Step: Publishing and Selling a Journal Through Printful
Step 1: Create a Free Account
Go to printful.com and sign up. Printful’s free plan has no monthly fee — you pay only when an order is placed. The Printful Growth plan unlocks discounts and additional branding options for higher-volume sellers.
Step 2: Browse and Select Your Journal
In your dashboard, navigate to the Product Catalogue and filter by Stationery. Select the notebook or journal style that fits your product vision. Review the base price, available customisation areas, and sample images before proceeding.
Step 3: Design Your Cover Using Printful’s Design Maker
Printful’s Design Maker is built into the dashboard. Upload your cover artwork, use the tool’s text editor to add copy, or build a design from scratch using their templates and design elements. The Design Maker generates photorealistic mockups you can use directly in your Etsy, Shopify, or WooCommerce listings, with no separate mockup tool required.
Unlike Printify, Printful does not currently offer customisable interiors for notebooks. The interior pages are pre-set (dotted or lined, depending on the product). Your creative control is focused on the cover design, which means a strong, distinctive cover carries even more weight on Printful than on platforms where interior design is also customisable.
Step 4: Connect Your Sales Channel
Printful integrates with Shopify, Etsy, WooCommerce, eBay, Amazon, TikTok Shop, Wix, and more. Connect your preferred store, then publish your product listing directly from the Printful dashboard.
Step 5: Order Samples
Printful offers a 20% discount on sample orders. Before going live, order at least one physical sample of your journal. Evaluate the cover print quality, colour accuracy, paper thickness, and binding. The spiral notebook’s wire-o binding and the hardcover’s elastic band are tactile product features that photographs do not fully convey, so holding the physical product is important before marketing it.
Step 6: Set Pricing, Write Your Listing, and Publish
Set your retail price to achieve your target margin. At the base cost of roughly $10 to $14 for a Printful notebook (varying by product and region), a retail price of $22 to $30 is defensible for a branded, premium-positioned journal. Write your product description and title with your target buyer’s search intent in mind. Publish.
Printful vs. Printify: The Key Difference
Printful delivers more consistent quality through its own production network but carries higher base costs. Printify offers more pricing flexibility through its multi-provider network and interior customisation options, but quality can vary between providers. Many serious journal creators use both: Printify for high-volume, lower-margin standard lines and Printful for premium, brand-flagship products. Order samples from both before deciding where to anchor your product.
[IMAGE PLACEHOLDER: Flat lay of Printful hardcover journal and spiral notebook side by side, showing cover print quality. Alt text: “Printful print-on-demand journals for creating and selling custom notebooks online”]
Platform 7: Gelato: Eco-Smart Local Printing Across 32 Countries
Gelato is one of the most globally capable print-on-demand platforms available. Its production network spans 140+ local print providers across 32 countries, with fulfilment reaching over 200 destinations worldwide (Gelato, 2025). The core idea behind Gelato is simple and compelling: instead of printing in one centralised location and shipping internationally, Gelato routes each order to the print facility closest to the customer. Shorter journeys mean faster delivery, lower shipping costs, and a smaller carbon footprint per order.
For journal creators targeting international buyers, this model is a genuine competitive advantage. A customer in Germany who orders from your Etsy shop gets their journal printed in Germany and delivered within days, not weeks. That speed and reliability drive repeat purchases and positive reviews more reliably than any marketing copy can.
Shopify rates Gelato as the best POD platform specifically for custom stationery (Shopify, 2025), making it a natural fit for journal and notebook products.
What Gelato Offers for Journal Creators
Gelato’s paper products catalogue includes custom notebooks and journals with personalisable covers and customised note paper interiors. Sizes and paper options vary by region and print provider. The platform’s PersonalisationStudio is a standout feature: it allows you to offer buyers the ability to customise their own journal cover with a name, initials, or personal text, an increasingly popular option for gifting markets and personalised stationery buyers.
Gelato’s subscription tiers include a free plan and paid options (Gelato+, Gelato Gold, and Platinum) that unlock additional discount rates and premium features. The Gelato+ plan at $24/month gives access to Shutterstock images and premium mockups. The Gelato Gold plan at $119/month provides deeper per-product discounts for higher-volume sellers.
Step-by-Step: Publishing and Selling a Journal Through Gelato
Step 1: Create Your Gelato Account
Go to gelato.com and sign up for free. No minimum orders, no upfront costs. Gelato offers 50% off your first order within 48 hours of signing up, making a sample order particularly affordable at the start.
Step 2: Connect Your Store
Gelato integrates directly with Shopify, Etsy, Wix, WooCommerce, and TikTok Shop, as well as via a custom API for developers. Connect your store in the dashboard before creating products. Unlike some platforms, Gelato’s store connection happens before product design, which keeps your publishing workflow cleaner.
Step 3: Browse the Catalogue and Select Your Notebook
Navigate to the Gelato product catalogue and filter for Paper Products or Stationery. Select your notebook or journal product. Note which print providers are available for your region, as product specifications (size, paper type, binding) can differ slightly by print location.
Step 4: Design Your Cover Using Gelato’s Design Tool
Gelato’s design tool is drag-and-drop and includes a built-in quality alert: if your image resolution is too low for the print area you have placed it on, the tool flags it immediately, a practical safeguard that prevents avoidable rejections. Upload your cover artwork, apply your design, and use the premium mockup tools to generate realistic product images.
If you plan to offer personalised journals, configure the Personalisation Studio settings for your product. This lets buyers add their own text directly on the product page before ordering.
Step 5: Set Pricing and Publish
Set your retail price, review Gelato’s transparent cost breakdown per product and region, and publish the product to your connected store. Gelato’s pricing is pay-as-you-go for the free plan; you pay production plus shipping costs per order placed by your customers.
Step 6: Order a Sample
Use the 50% first-order discount to sample your journal before going live at full marketing volume. Gelato’s print quality for paper products receives consistently strong reviews, particularly for colour fidelity and paper finish.
Why Gelato Is Especially Strong for International Creators
For DSE readers based in Nigeria, across Africa, or anywhere outside the US and UK, Gelato’s local printing model addresses the biggest pain point in international POD: prohibitive shipping costs and slow international delivery times. When your buyers are in the US, UK, or Europe, Gelato’s local print network means they pay domestic shipping rates and receive their journal in days. That directly improves your conversion rate and reduces cart abandonment from buyers who baulk at international shipping costs.
Platform 8: Blurb: Premium Journals for Creatives and High-End Niches
Blurb occupies a deliberate position at the premium end of the POD market. Where most platforms optimise for speed and low base cost, Blurb optimises for print quality. It is built for creatives who want their physical product to reflect the quality of their creative work, without compromise on paper finish, colour accuracy, or binding.
For journals, Blurb makes the most sense when your product is positioned as premium: art journals with full-bleed photographic or illustrative covers, limited-edition branded notebooks for creative agencies, high-touch wellness journals in the $30 to $60 retail range, or companion journals for published authors and course creators who want their physical products to feel as elevated as their digital ones.
What Blurb Offers for Journal Creators
Blurb’s product range for notebooks and journals includes trade books, photo books, and magazines in a wide range of sizes and finishes. Paper options are extensive, and the printing reputation, particularly for colour vibrancy, image sharpness, and professional binding, is among the strongest in the POD space (GemPages, 2025).
Blurb offers two distribution paths. The first is Blurb Direct Sales, where you sell through your own website or direct channels and receive a higher per-unit margin. The second is the Global Retail Network, with a recommended 55% wholesale discount for placements in booksellers and distributors. Volume discounts apply for orders of ten books or more (20% off), up to 50+ books (25% off).
Step-by-Step: Publishing a Journal on Blurb
Step 1: Create Your Account
Go to blurb.com and sign up for free. Blurb’s publishing tools are free to use; you pay per book when ordering.
Step 2: Choose Your Format and Design Tool
Blurb supports several design pathways: BookWright (Blurb’s free desktop design application), Adobe InDesign via a Blurb plugin, Adobe Lightroom for photo-heavy journals, and direct PDF upload for creators who have already designed their book elsewhere.
For journals with rich visual content, art journals, travel journals, photography-led wellness books, BookWright or the InDesign plugin are the recommended paths. Both provide precise control over typography, image placement, and page layouts.
Step 3: Design Your Interior and Cover
Use Blurb’s free templates as a structural base or build from scratch. For journals, consider what interior page style serves your buyer: blank pages for sketching, lined pages for writing, or a hybrid layout combining both. Blurb’s print quality rewards ambitious interior design; if you invest in high-quality page layouts, the physical product will reflect that investment.
The cover uses a full wraparound design. Blurb supports both soft cover (with or without flaps) and hardcover (with dust jacket or imagewrap). For premium journals, hardcover imagewrap, where your cover design is printed directly onto the board without a dust jacket, delivers a clean, professional result.
Step 4: Use the Pricing Calculator
Blurb’s Pricing Calculator at blurb.com/pricing calculates your print cost based on format, page count, paper type, and colour. Blurb’s base costs are higher than most POD platforms. Factor this in when setting your retail price. A 150-page full-colour softcover journal might cost $15 to $20 to print, meaning a retail price of $35 to $45 is needed to maintain a reasonable margin.
This higher price point is viable in premium niches where buyers understand and accept quality pricing. It is less viable in mass-market niches where buyers expect low prices and comparison shop aggressively on Amazon.
Step 5: Upload, Preview, and Order a Proof
Upload your files, run Blurb’s pre-flight check, review the online proof carefully (Blurb’s colour rendering in the previewer is more accurate than most platforms), then order a physical proof copy before going live.
Step 6: Choose Your Distribution and Set Pricing
Select between Blurb Direct Sales (sell through your own website, keeping a larger margin) and the Global Retail Network (broader exposure but at the standard wholesale discount). Set your retail price in Blurb’s pricing interface.
Blurb’s Honest Limitations
Blurb is more expensive per unit than Printify, Printful, or Gelato. Its setup is more involved than most platforms. The Blurb logo appears on books unless you pay an additional fee to remove it. For high-volume, low-margin journal lines, Blurb is the wrong tool. For a small, carefully curated line of premium journals where quality is your primary selling point, Blurb is one of the few POD platforms that can genuinely deliver on that promise.
Platform Comparison: Which One Is Right for You?
No single platform is best for every journal creator. Your choice depends on your product type, distribution goals, technical confidence, and where your target audience shops.
| Platform | Best For | Key Strength | Notable Limitation |
| Amazon KDP | High-volume, marketplace-first strategy | Largest single audience; zero upfront cost | Competitive; limited distribution outside Amazon without Expanded Distribution |
| IngramSpark | Guided/authored journals for bookstores and libraries | Global distribution to 40,000+ outlets | Blank/low-content journals not accepted; steeper learning curve |
| Lulu | Spiral-bound planners; creators with their own websites | Coil binding; Lulu Direct for white-label web sales | Smaller audience than Amazon |
| B&N Press | Authors going wide beyond Amazon | Direct access to BN.com readers; guided setup | Limited to 12 countries; library distribution not included |
| Printify | Merchandise-style journals for Etsy/Shopify | Most flexible provider network; competitive pricing; interior customisation | Quality varies by provider; requires a connected store |
| Printful | Premium brand-quality journals for Etsy/Shopify | Owned production facilities; consistent quality; wire-o spiral binding | Higher base cost than Printify; limited interior customisation |
| Gelato | International creators; eco-conscious brands | Local printing in 32 countries; faster global delivery; Personalisation Studio | The stationery catalogue is smaller than Printify; premium plans are needed for the best tools |
| Blurb | Premium creative journals, art journals, and high-end niches | Best-in-class print quality for colour and binding | Highest base cost; Blurb logo on books unless removed for a fee |
The Smart Multi-Platform Strategy
A well-structured journal publishing operation does not rely on a single platform. Here is a practical tiered approach:
For maximum marketplace volume: Start on Amazon KDP. Use Book Bolt for niche research and interior design at speed.
For bookstore and library distribution: Add IngramSpark for any journal with enough authored content to qualify. Disable KDP Expanded Distribution to avoid channel conflict.
For your own website and spiral-bound products: Add Lulu for coil-bound planners and white-label direct sales via Lulu Direct.
For Etsy and Shopify merchandise: Use both Printify (for pricing flexibility and interior customisation) and Printful (for premium product lines where quality consistency justifies the higher base cost).
For international buyers and eco-positioning: Integrate Gelato for faster, cheaper fulfilment to buyers in the US, UK, Europe, and beyond.
For high-end or limited-edition journals: Use Blurb when premium quality is your core value proposition, and your pricing reflects it.
Pricing Your Journal for Profit
Pricing is where many first-time journal creators leave money on the table. The instinct is to price low to compete. The smarter instinct is to price for your niche and your value.
A plain-lined notebook on Amazon KDP competes primarily on price. A prompted gratitude journal with a strong niche angle and a compelling brand competes on specificity and perceived value. These are different markets with different pricing ceilings.
The Pricing Framework
Calculate your floor. On KDP, your floor is the minimum price Amazon allows based on printing costs. On IngramSpark, your floor is the printing cost plus enough margin to cover the wholesale discount. Never set your price at or near the floor unless you are deliberately using a loss-leader strategy.
Research the ceiling. Search for comparable journals in your niche on Amazon, Etsy, and Barnes & Noble. Note the price range of the top 10 to 20 results. Identify the mid-to-upper range. Price within or slightly above that range if your product quality, cover design, and marketing positioning support it.
Factor in your goals. If your journal is a lead magnet for a coaching programme or a companion to an online course, you can afford to price it at cost or below, because the journal’s true job is to bring buyers into your ecosystem. If the journal is a standalone revenue stream, price it to generate meaningful income per unit.
Test and iterate. Pricing on POD platforms is not permanent. Adjust your price every 30 to 60 days based on sales data, conversion rates, and competitor movements. Most platforms do not charge fees for price changes.
Marketing Your Journal After Publishing
Publishing your journal is the beginning of the work, not the end. A perfectly designed journal sitting in a marketplace with no external promotion will sell slowly. The creators who generate consistent income from journals are those who treat marketing as part of the product strategy from day one.
Build a Presence Before You Launch
Before your journal goes live, create at least one social media presence that speaks to your target audience. Pinterest is particularly effective for journals and planners because pins have long search lives, and visual products perform well. Instagram and TikTok work for behind-the-scenes design content, journal reviews, and use-case demonstrations.
Start building your audience two to four weeks before launch. Share your design process, show inside pages, talk about who the journal is for and why you created it.
Optimise Your Listing as a Sales Asset
Your product description is a direct-response sales document. It should answer three questions quickly: Who is this for? What will they get from it? Why should they buy it now?
On Amazon, the A+ Content feature (available to brand-registered sellers) allows you to add enhanced images and comparison tables to your listing. On Etsy, high-quality listing photos showing the journal open, styled on a desk, and held in hands convert browsers into buyers more reliably than any other element.
Leverage Email Marketing
If you already have an email list from a blog, podcast, or other content platform, your journal launch is a natural offer to make. Send a dedicated email to your list. Give them a reason to act (a limited-time discount, a bonus prompt set, or simply the clarity of speaking directly to what your journal offers).
Request Reviews
On Amazon, social proof through reviews directly affects search ranking. After a buyer has had time to use your journal (two to four weeks post-purchase), follow up through your author page or any communication channels you have. On Etsy, your post-purchase message can gently invite customers to leave a review.
Consider Amazon Advertising
Amazon’s sponsored product ads allow you to place your journal at the top of search results for targeted keywords. For a new listing with no review history, paid visibility is often the fastest way to generate the first wave of sales that builds organic ranking.
Start with a modest daily budget of $5 to $10 and target the most specific keywords in your niche. Analyse your Advertising Cost of Sale (ACoS) weekly and adjust bids based on which keywords are generating profitable sales.
Common Mistakes to Avoid
Designing the cover before finalising the interior. The spine width, which determines whether your cover template is correct, depends on page count and paper type. Always complete your interior first.
Exporting at low resolution. Files exported below 300 DPI print with visible pixelation, blurring on text, and faded images. Always export at exactly 300 DPI or higher.
Ignoring CMYK. RGB files will produce colour shifts in print. Build and export in CMYK from the start.
Using the same ISBN across platforms. Each platform requires its own ISBN or generates its own ASIN. Do not use the ISBN that Bowker assigned to your KDP listing on IngramSpark.
Enabling KDP Expanded Distribution while also using IngramSpark. These two distribution networks will compete for the same wholesale orders and can create pricing conflicts. Disable KDP Expanded Distribution when using IngramSpark for wide distribution.
Pricing too low, too fast. Low prices are hard to raise later without negatively affecting conversion rates. Start at a competitive but sustainable price and adjust downward only if sales data justifies it.
Not ordering a proof copy. Mockups and screen previews never fully represent the physical product. Order a proof from every platform before launching. The small cost of a proof copy prevents the much higher cost of a flawed product from reaching customers.
FAQ
How do I create and publish a journal online for free? Amazon KDP and Lulu both allow you to publish at zero upfront cost. You need a free account, a free design tool like Canva, and your own time. The only potential cost is purchasing an ISBN if you plan to distribute widely, but both KDP and Lulu offer free ISBNs for their own platforms.
Can I publish the same journal in multiple platforms simultaneously? Yes, with one critical exception. If you enrol in KDP Select (for ebooks), Amazon requires exclusivity for 90 days. For print journals (paperbacks and hardcovers), there is no exclusivity requirement. You can publish the same journal on KDP, Lulu, B&N Press, and IngramSpark at the same time. Use separate ISBNs for each platform where you supply your own.
How many pages should my journal have? For a standard journal, 100 to 150 pages is the most common range. This keeps the printing cost manageable while providing enough space for meaningful daily use. Planners and prompted journals often run 180 to 240 pages because of their structured layouts. More pages mean a higher printing cost, so model your royalties at your target page count before finalising.
Do I need an ISBN to publish a journal? On Amazon KDP, Amazon does not assign its own ASIN, and you can publish without an ISBN, though KDP will provide a free one. On IngramSpark, yes, you must supply your own ISBN or use one from their partner. On Lulu, an ISBN is required only for Global Distribution. Purchasing your own ISBN from Bowker is always recommended for full portability.
What is the best trim size for a journal? 6 x 9 inches is the most standard and widely stocked size across platforms. 5 x 8 inches is preferred for pocket journals. 7 x 10 inches suits planners with wider layouts. 8.5 x 11 inches is common for art journals and sketchbooks. Start with 6 x 9 if you are uncertain; it is the size readers are most familiar with and most likely to search for.
How do I create and publish a journal on Printify for Etsy? Create a Printify account, browse the Journals and Notebooks catalogue, design your cover using the Product Creator, connect your Etsy store to Printify, write your product listing with keyword-optimised titles and descriptions, set your price, and publish. When an order comes in on Etsy, Printify fulfils it automatically.
Can IngramSpark distribute to Amazon? Yes. IngramSpark can distribute to Amazon through its wholesale network. If you use this route, ensure your IngramSpark pricing is competitive with your KDP listing to avoid Amazon consistently sourcing the cheaper version. Many authors disable IngramSpark’s Amazon channel and use KDP exclusively for Amazon sales.
How long does it take for a journal to go live after publishing? Amazon KDP: 24 to 72 hours. IngramSpark: 24 to 48 hours for the digital proof, then 2 to 3 weeks to appear in retail catalogues. Lulu: immediate for the Lulu Bookstore; longer for Global Distribution. Barnes & Noble Press: up to 72 hours. Printify: immediately upon publishing the product to your connected store.
What is the difference between Printify and Amazon KDP for publishing journals? KDP publishes your journal as a book product in Amazon’s book marketplace, where readers search for titles by topic, author, and keyword. Printify produces your journal as a physical merchandise item and connects it to Etsy, Shopify, or other e-commerce stores, where buyers search for custom stationery and gifts. These are different audiences, different discovery mechanisms, and different product positioning strategies.
How do I stand out in a saturated journal market? Niche precision is your most powerful differentiator. A journal designed for a specific audience, with a thoughtful interior, a distinctive cover aesthetic, and a well-optimised listing will consistently outperform a generic journal in search results and conversion rates. Layer that with an authentic social media presence and targeted advertising, and you build compounding visibility over time.
What is the difference between Printful and Printify for journals? Printful owns its own production facilities and delivers consistent quality across all orders at a slightly higher base cost. Printify works with a network of third-party print providers, giving you more pricing flexibility and interior customisation options, but quality can vary depending on the provider you select. Printify is generally better for budget-conscious, high-volume journal lines. Printful is better when quality consistency and a premium brand position justify the higher cost per unit.
What is Gelato, and why should I use it for journals? Gelato is a print-on-demand platform with local printing facilities in 32 countries. Instead of printing in one location and shipping internationally, Gelato routes each order to the printer closest to the customer. This reduces shipping costs and delivery times significantly for international orders. It is particularly valuable for creators whose buyers are spread across the US, UK, Europe, and beyond. Gelato also offers a Personalisation Studio that lets buyers add their own text or name to a journal cover at the point of purchase.
Is Blurb worth it for publishing journals? Blurb is worth it specifically for premium, high-end journals where print quality is the primary selling point. Its per-unit cost is the highest among the platforms in this guide, which means it is not suitable for mass-market, price-competitive niches. It is best suited for art journals, photography journals, limited-edition branded notebooks, and companion journals for premium coaching programmes or courses where a retail price of $35 and above is defensible.
What is Book Bolt, and does it publish my journal? Book Bolt is not a publishing or printing platform. It is a KDP-specific design and research tool. It helps you research profitable niches using real Amazon search data, design journal interiors and covers with 130+ pre-built templates, and export KDP-ready PDFs with one click. It is exclusively useful for Amazon KDP workflows and does not publish or distribute to IngramSpark, Lulu, or any other platform. If Amazon KDP is your primary channel, Book Bolt is a powerful workflow tool. If you publish across multiple platforms, you will need additional tools for those channels.
Can I use Gelato if I am based in Nigeria or Africa? Yes. Gelato is free to sign up for, and you can sell to buyers worldwide. Your customers receive their journals printed locally near them, so a buyer in the UK or the US gets domestic-speed delivery regardless of where you are based as the seller. For payments, Gelato supports international bank transfers and PayPal. Your primary selling channels (Etsy, Shopify) have their own payment payout options for international creators.
Publishing a journal is one of the most accessible, lowest-risk, and highest-leverage product strategies available to independent creators today. With eight distinct platforms now covered in this guide, you have a clear picture of where each one fits, what it requires, and how to execute.
The route is clear: start with Amazon KDP for reach and speed (using Book Bolt to accelerate your niche research and design workflow), add Lulu for creative format flexibility and spiral-bound planners, use IngramSpark when your journal carries enough authored content to qualify for bookstore distribution, publish on B&N Press to serve that readership directly, and build a POD merchandise line using Printify for pricing flexibility, Printful for premium quality, Gelato for international buyers, and Blurb for high-end creative niches where quality is your entire value proposition.
The creators winning in this space are not simply the ones with the most beautiful covers. They are the ones who chose a specific audience, solved a specific problem, selected the right platform mix, published consistently, and treated marketing as equal in importance to design.
Your next step is a concrete one: choose your niche, download a Canva template or Book Bolt interior, and build your first journal file this week. The platforms are ready. The audience is there. The only variable left is your decision to begin.
If you want personalised guidance on positioning your journal, structuring your product catalogue, or integrating journals into a larger content and consulting strategy, book a Transformation Clarity Call (TCC) with the DSE team. We work with creators, coaches, and entrepreneurs who are ready to turn their expertise into products that generate income without trading hours for rands.